發表文章

目前顯示的是 3月, 2021的文章

DataStore Proto Data
圖片
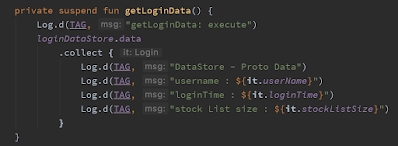
DataStore - Proto Data 流程 1. build.gradle 設定 Project 設定,加入 com.google.proroubf:protobuf-gradle-plugin:0.8.15 Module 設定  Code 加入 id "com.google.protobuf" 加入 protobuf { } dependencies 加入 implementation 2. 建立 proto 資料夾 切換到 Project 在 src -> main 這層建立資料夾 名稱是 proto 對 proto 資料夾新增 File 名稱可以自定義 命名為 login_prefs.proto 3. 第一次建立檔案提醒 點選 install plugins 按照步驟安裝 安裝完成後,可以到 Preferences 確認 Protocol Buffer Editor,沒有可以自行搜尋安裝 選擇 Plugins 確認 Protocol Buffer Editor 是否安裝 4. 編輯 .proto 檔案 java_package 填入 package name message 可以自行定義,之後可以修改 Login 內的變數可以自行定義,要確認資料型態 int32 代表 int, 這邊轉換的方式可以到 Google language Guide 查看  網址 選擇 proto3 -> Scalar Value Types 設定完成後,記得要 Rebuild Project Build -> Rebuild Project 切換到 Project 確認系統在 proto 資料夾下已經產生 3 個檔案 名稱會依據 message 設定的名稱不同而有所改變 5. 處理 Serializer 檔案 新增 Kotlin FIle 命名為 SettingSerializer.kt 官網介紹文件 :  網址 可以直接複製, val Context 這一段程式碼不用複製 參考  Code  要注意不要直接貼上 6.  主要程式碼 (RecyclerViewActivity.kt 中運行) Code 定義 Context.loginDataStore (可以修改) fileName 是儲存檔案的名稱可以修改 serializer 是上
Kotlin RecyclerView + CardView use viewBinding #android studio #toturial

圖片
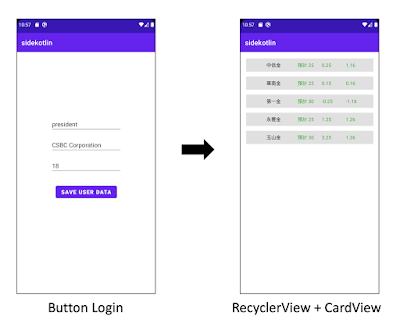
 Kotlin RecyclerView + CardView use viewBinding  1. build.gradle (Module) add dependencies set viewBinding true add implementation 2. Create RecyclerViewActivity & activity_recycler_view.xml Code use tools:listitem check UI Layout tools attribute reference describe :  https://www.eeaseries.com/2021/03/tools-attributes-reference.html 3. check viewBinding file is create check ActivityRecyclerViewBinding.java file is create if not find ActivityRecyclerViewBinding.file Rebulid Project 4. create stock_list_item.xml use cardView Code 5. Create StockAdapter use ViewBinding + RecyclerView Code use ArrayList<Stock> to store information in onBindViewHolder use stockList[position] to setText in TextView need to check stockList.size > 0, otherwise RecyclerVIew will not print data 6. Create Stock.kt to Store information Code 7. prepare RecyclerViewActivity.kt dataList Code prepare data (1) use viewBing to control RecyclerView (2) prepare stockList (3) set stocklist data to adapter (4)

DataStore Preference use Kotlin + ViewBinding

圖片
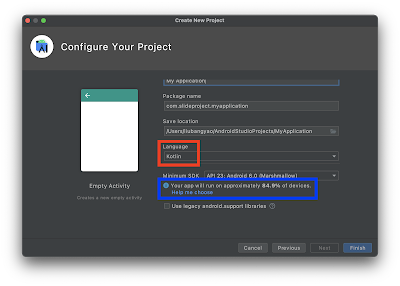
確認選擇的語言為 Kotlin 藍框部分為 API Distribution 目前已無法在官方文件上查看 : 網址 步驟 1. 選擇 build.gradle (Module) 2. android { } 加入 buildFeatures 3. dependencies 加入 Preferences DataStore, Lifecycle component, Kotlin coroutines components 4. 加入 UI Layout 畫面中有 3 個 EditText,分別可以輸入姓名, 證券戶, 年齡,點選 Button 即可儲存. 下次開啟 APP 會把儲存的資料顯示在 EditText 5. ViewBinding 設定 選擇 Project app -> build -> generated -> data_binding_base_class_source -> debug -> out -> com -> ... 至 databinding 資料夾 沒有找到指定的 Binding.java 可以點選 Rebuild Project 會產生 .java 檔案 ( Binding 檔名稱範例 ) StartupActivity -> StartupActivityBinding.java RecyclerViewActivity -> RecyclerViewActivityBinding.java ViewBinding Google 官網文件 6. ViewBinding 可以減少 findViewById 動作,透過 binding.元件 即可操作 7. Create DataStore,檔案名稱 User.kt name = "user_prefs" 8. 如何查看 user_prefs 檔案 ( 要確認有執行過 ) 開啟 Device File Explore 進入到 data -> data -> 專案路徑下,選擇 files -> datastore -> user_prefs.preferemces_pb 點擊兩下可以查看 UI 畫面 9. Create UserManager Create KEY 10. StartupAc

熱門文章

TourCard 開通全紀錄 台胞證 支付寶

svn 刪除使者資訊 & 查看使用者帳號密碼

[ 教學 ] 如何使用 Sourcetree 對 Github 進行版本控制 #Mac OS 版本控制